E mail system at GUtech
Staff Email system

|
Microsoft Exchange 2010 hosts staff emails. All mails are routed through Trend Micro
hosted service facility for mail security and spam filtering. You should get a username
and password from ITS to access emails and portals. The windows account is the single
window authorization for network resources.
|
Mails can be accessed either through a mail client program such as Microsoft outlook
or using Outlook web
app.
First time users of web mail, please note that the Time zone to be set as as “UTC+4:00
Abu Dhabi, Muscat”.
(Refer Appendix 1 for more configuration of exchange in Mobile)
Student Email System
Student emails are hosted with Office 365 for Education ® at Microsoft cloud services.
You should get a username and password from ITS to access emails and portals of
Office 365.
-
In Office 365, to access your email, click Outlook at the top of the page.
Or, you can go directly to your email at any of the following URLs:
https://www.outlook.com/student.gutech.edu.om
- Sign in to your personal Microsoft account at https://skydrive.live.com/, using the same user name and password
you used with Live@edu.
- This is now a personal account for you, which means that your educational institution's
administrator can no longer reset the password.
- You can change the password on this account whenever you want to.
- This account gives you access to all your SkyDrive content and other Microsoft services
such as Messenger.
- If you need help with this account, see Microsoft account help.
 How do I set up
Microsoft Exchange email on an Apple iPhone, iPad or iPod Touch?
How do I set up
Microsoft Exchange email on an Apple iPhone, iPad or iPod Touch?
(for GUtech students only)
- Tap Settings > Mail, Contacts, Calendars > Add Account.
- Tap Microsoft Exchange.
- You don’t need to enter anything in the Domain box. Enter the information requested
in the Email, Username, and Password boxes. You need to enter your full e-mail address
in the Email and Username boxes.
For example:
- Email address : Student-ID@student.gutech.edu.om
- Username : Student-ID
- Password : xxxxxxxxx
- Tap Next on the upper-right corner of the screen. Your iPhone will try to find the
settings it needs to set up your account.
- Choose the type of information you want to synchronize between your account and
your device, and then touch Save. By default, Mail, Contacts, and Calendar information
are synchronized.
 How do I set up
Exchange ActiveSync on an Android mobile phone?
How do I set up
Exchange ActiveSync on an Android mobile phone?
(for GUtech students only)
- From the Applications menu, select Email.
- Type your full email address, for example student-ID@student.gutech.edu.om,
and your password, and then select Next.
- Select Microsoft Exchange ActiveSync. This option may be named Exchange ActiveSync
on some versions of Android.
- Enter the following account information and select Next.
- Domain\Username Type your full email address in this box. If Domain and Username
are separate text boxes in your version of Android, leave the Domain box empty and
type your full email address in the Username box.
- Password Use the password that you use to access your account.
- Exchange Server Use the address of your Exchange server. To find this address, see
“Finding the Server Name” later in this topic.
For example:
Domain\Username : Student-ID@student.gutech.edu.om
Username : Student-ID
Exchange Server : http://mail.office365.com/
- As soon as your phone verifies the server settings, the Account Options screen
displays. The options available depend on the version of Android on your device.
The options may include the following:
- Email checking frequency The default value is Automatic (push). When you
select this option, email messages will be sent to your phone as they arrive. We
recommend only selecting this option if you have an unlimited data plan.
- Amount to synchronise This is the amount of mail you want to keep on your
mobile phone. You can choose from several length options, including One day, Three
days and One week.
- Notify me when email arrives If you select this option, your mobile phone
will notify you when you receive a new email message.
- Sync contacts from this account If you select this option, your contacts
will be synchronized between your phone and your account.
- Select Next and then type a name for this account and the name you want displayed
when you send email to others. Select Done to complete the email setup and
start using your account.
Mobile phone configurations
How do I set up GUtech Exchange ActiveSync on an Apple Mobiles
(for GUtech staff only)
For Step by Step Configuration, please click here
Mobile phone configurations
How do I set up GUtech Exchange ActiveSync on an Apple Mobiles
(for GUtech staff only)
- Tap Settings > Mail, Contacts, Calendars > Add Account.
- Tap Microsoft Exchange.

- You don’t need to enter anything in the Domain box. Enter the information requested
in the Email, Username, and Password boxes. You need to enter your full e-mail address
in the Email and Username boxes
For example:
Email address : firstname.lastname@gutech.edu.om
Username : firstname.lastname
Password : xxxxxxxxx
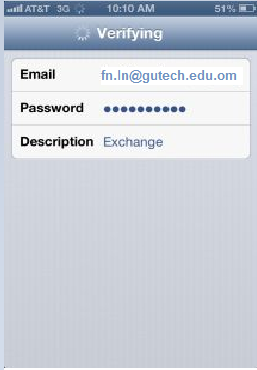
- Tap the Next button and the device will attempt to verify the account. You may receive
an "Unable to Verify Certificate message," go ahead and Tap the Accept button.
- The device will than continue verifying the account. Once complete, tap the Server
field, and enter in "outlook.gutech.edu.om" minus the parenthesis.
- Tap Next on the upper-right corner of the screen. Your iPhone will try to find the
settings it needs to set up your account.
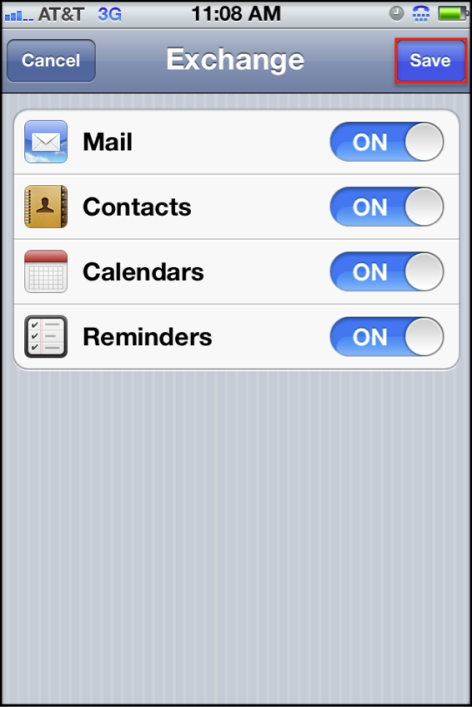
- Choose the type of information you want to synchronize between your account and
your device, and then touch Save. By default, Mail, Contacts, and Calendar information
are synchronized.
- Tap the Next button and the device will then try to create a secure (SSL) connection
to your Exchange server. When connected, you'll see check marks along your settings
to confirm that your account has been verified.
- Tap the ON/OFF buttons to select which information to synchronize with the Exchange
server and then tap the Done button when finished.
Note: Your iPhone may take a moment to sync all your information depending on how
much you have on the Exchange server. To learn more about the mail settings on your
device tap Settings from the home screen, than Mail, Contacts, & Calendars and then
select your account. You'll be able to customize how much data you would like to
sync from the server.
How do I set up GUtech Exchange ActiveSync on an Android mobile phone?
(for GUtech staff only)
- From the Applications menu, select Email.
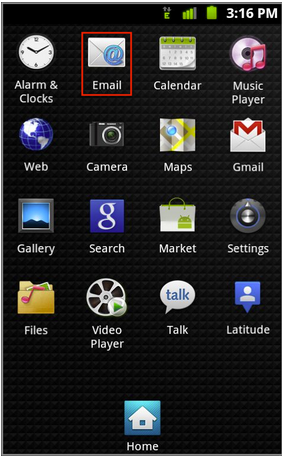
- Type your full email address, for example firstname.lastname@gutech.edu.om,
and your password, and then select Next and select Microsoft Exchange ActiveSync.
This option may be named Exchange ActiveSync on some versions of Android.
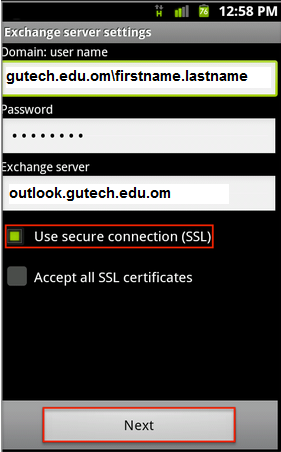
- Enter the following account information and select Next.
Domain\Username Type your full email address in this box. If Domain and Username
are separate text boxes in your version of Android, leave the Domain box empty and
type your full email address in the Username box. Password Use the password that you use to access your account. Exchange Server Use the address of your Exchange server. To find this address, see
“Finding the Server Name” later in this topic.
For example:
Domain\Username : gutech.edu.om\firstname.lastname
Password : ********
Exchange Server : outlook.gutech.edu.om
|
 |
- As soon as your phone verifies the server settings, the Account Options screen displays.
The options available depend on the version of Android on your device. The options
may include the following:
- Email checking frequency The default value is Automatic (push). When you select
this option, email messages will be sent to your phone as they arrive. We recommend
only selecting this option if you have an unlimited data plan.
- Amount to synchronise This is the amount of mail you want to keep on your mobile
phone. You can choose from several length options, including One day, Three days
and One week.
- Notify me when email arrives If you select this option, your mobile phone will notify
you when you receive a new email message.
- Sync contacts from this account If you select this option, your contacts will be
synchronised between your phone and your account.
- Select Next and then type a name for this account and the name you want displayed
when you send email to others. Select Done to complete the email setup and start
using your account.